IntroductionOn this section you will be guided through a series of steps to finish the setup of your Galicaster Class unit. Please, read this documentation carefully and follow its instructions. In case of doubts please take advantage of the Galicaster Community list to make any question or suggestion. If you have purchased this unit from Teltek Video Research contact us directly through the channels we've provided. In the following sections you will receive instructions on how to connect and configure you Galicaster unit. Some of the sections may not affect you because of the hardware you've installed or the type of installation you made, so ignore them and focus on the ones that matters to you. |
Galicaster Autostart
By default, Galicaster is started automatically as the operative system is loaded. To change this do the following:
- Press Win and write Startup Applications,
- Check out Galicaster to disable the autostart
- Repeat the operation to re-stablish the autostart
You may want to do it using the terminal:
- Delete ~/.config/autostart/galicaster.desktop
To re-stablish the autostart:
- cp /usr/share/applications/galicaster.desktop ~/.config/autostart/
Shortcuts
To configure the operative system supporting Galicaster you may exit Galicaster or change the current desktop. To do so:
a. If the admin mode is activated you can quit on the welcome page, on the quit button on the bottom right corner.
- To access the welcome page you can't be recording
b. If the admin mode isn't active then you can use a keyboard shortcut Ctrl+Shift+Q, to do so the Num Block has to be activated.
c. You may not want to exit Galicaster and still change configuration on the OS, use the combination Ctrl+Alt+Left/RightArrow to switch between desktops (usually four).
To run Galicaster once closed use the Shortcut in the Desktop or press Win and write Galicaster to look for the application launcher.
A. Cards and connectors
The Galicaster Mobile Unit comes equipped with different inputs to fulfil your needs on recording multistream material. Depending on the devices you are about to use you should combine those inputs properly.
There are two main combinations, depending on the type of camera (NTSC or SDI) you use to record the presenter. In both cases you have to use a VGA grabber to record the slides. Those combinations will be explained briefly on the next two sections.
Please, take a closer look to the image to identify the ports of each capture card before connecting anything.
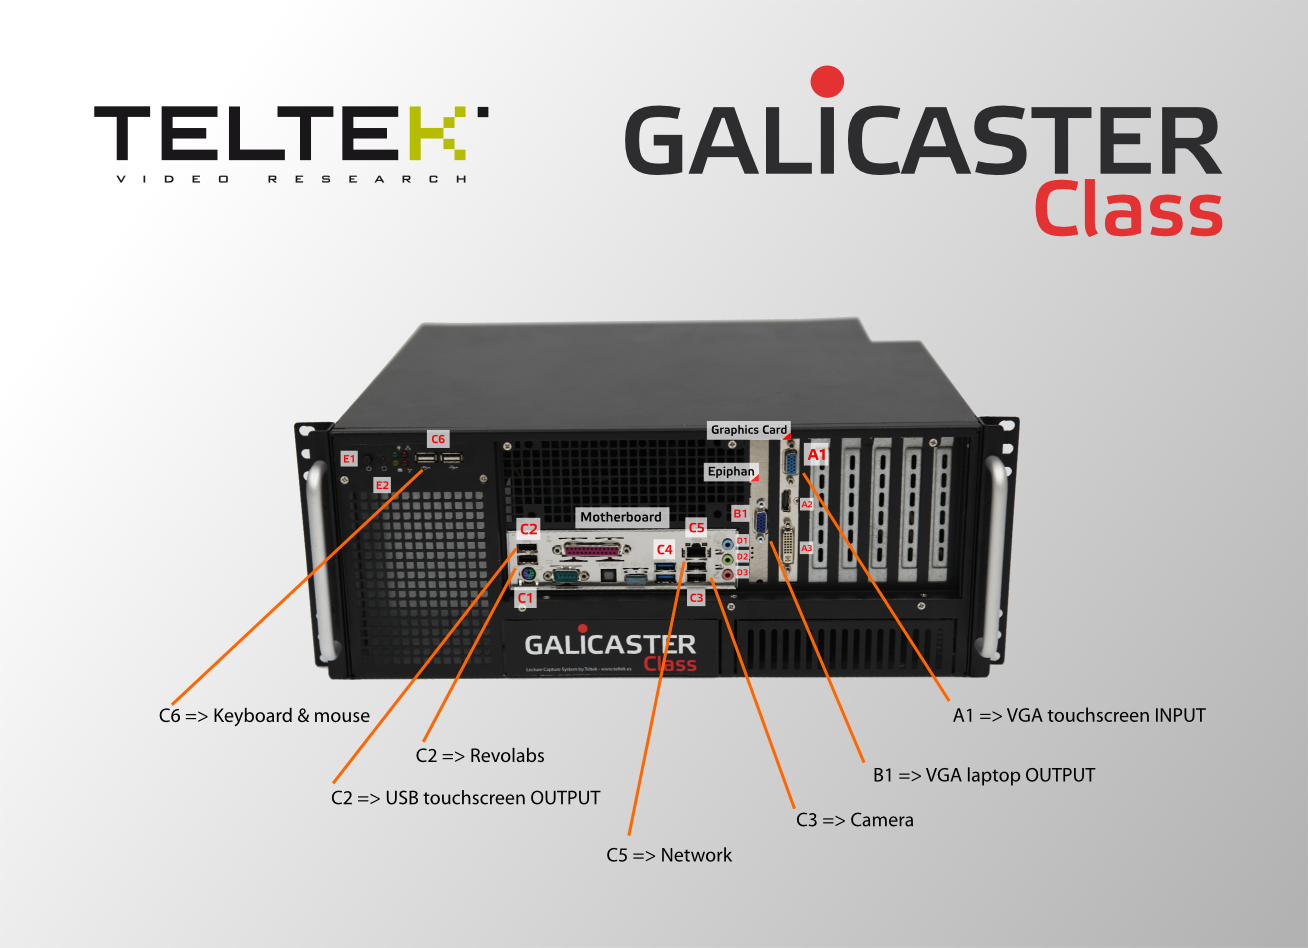
d.On-board sound card
| # | Port | Description |
|---|---|---|
| D1 | Line IN | (Recommended) To connect a mixer or a line level microphone to record, mini-jack 3.5mm. |
| D2 | Headphones OUT | To connect a mixer or a microphone to record, mini-jack 3.5mm. |
| D3 | Microphone IN | To connect a microphone to record, mini-jack 3.5mm. |
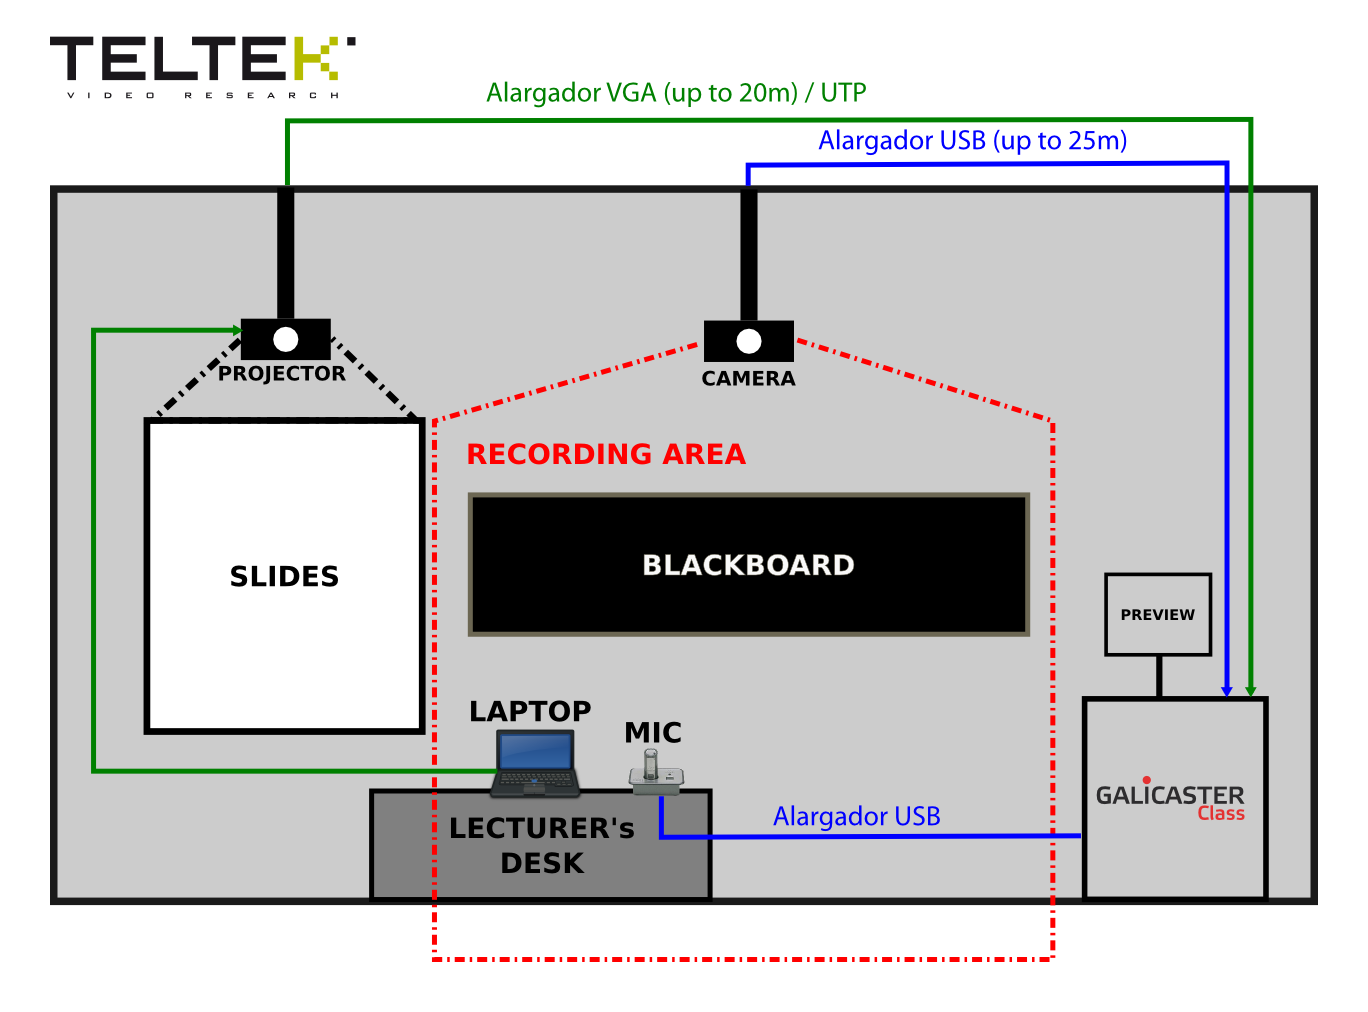
B. Room installation
|
There plenty of variations for a room to be equiped with Galicaster. On every step we will point out some recommendations and instructions to achieve the best solution to your needs. a. Place the rack
b. Place the screen
c. Place the microphone
d. Wire everything:
e. Place warnings on the room and the unit:
|
Click on the image to enlarge.
|
C. Capture Devices configuration
Galicaster configuration is specified in two files conf-dist.ini and conf.ini. You can download two different models of conf.ini depending on the cards you are using:
- Blackmagic + Epiphan: conf.ini
- Hauppauge + Epiphan: conf.ini
Now, it's time to configure the card you've selected and audio. More information about this matter is available here.
B.1 Hauppauge configuration
Before running Galicaster you may have to configure your Hauppauge card. Connect your camera and do the following:
Standard selection
You have to choose between a list of standards. To list and select the standard, run in a shell:
v4l2-ctl -d /dev/haucamera --list-standards | grep Index -A 2
v4l2-ctl -d /dev/haucamera -s 0
Input selection
Depending on the input you are using you have to choose between S-Video (4-pin) and Composite (RCA). To list and select the input, run in shell:
v4l2-ctl -d /dev/haucamera -n | grep Input -A 1
v4l2-ctl -d /dev/haucamera -i 2
Inputs 1 and 3 are for 4-pin.
Inputs 2, 4 and 5 are for RCA.
B.2 Blackmagic configuration
To list the input standards and formats supported by Blackmagic cards run the following line in a shell:
gst-inspect-0.10 decklinksrc | grep Enum -A 20
Once you identified the format you want to capture, edit the conf.ini file you've just downloaded. Search for the track Blackmagic and change the parameters input and input_type for their right values. Some try-and-error may be neccessary since maybe you can't gather all the information from your video source.
The p in 1080p stands for progressive
The i in 1080i stands for interlaced
C.3 Sound configuration
To have the best audio feedback on your interface you should configure your audio inputs properly. First of all, go to the Sound Manager (speaker icon on the top right corner of the desktop)
Headphones output
Regulate this slide bar to a comfortable sound level.
Pulse input ( Line in):
If you are using the Hauppauge card please skip this section
Select the input you are using and set the values to 100% volume, no amplification.
Later, if you have distortion on your audio input, edit the conf.ini and set amplification = 1.0 in the AudioSource device.
Recommendation
On the pulse track of your conf.ini, don't leave the value location as _default. List the inputs and set it. This way you won't need to check it every time you switch on your unit. To do that, run in a shell:
pactl list | grep Source -A 2
Identify the input you want to use, for example
alsa_input.pci-0000_00_1b.0.analog-stereo
Use the name as location on the conf.ini pulse track
[track3]
name = AudioSource
device = pulse
flavor = presenter
active = True
*location = alsa_input.pci-0000_00_1b.0.analog-stereo*
file = sound.mp3
amplification = 2.0
vumeter = True
player = True
Galicaster Vumeter
Add this section in the conf.ini file.
[audio]
min = -60
max = 0
If the NO SOUND dialog is coming in and out constantly, set a higher value on min, for example -40.
Alsa Advanced configuration
If you still experience problems after configuring the Sound Manager and your Mixer or Sound input device, you should take a look to ALSA.
Run alsamixer on a shell and ensure that your device is not being amplified.
- Press F6 to select the input and F4 to go to the Capture section.
- You can check the real Gain on Item on the top left corner of the screen.
C. Network Configuration
To change your IP settings, pleas read this official Ubuntu guideline.
The Network Manager is on the top right corner, Right-button click on the double arrow icon.

D. Opencast Matterhorn related configuration
If you have a OC-Matterhorn running you have to ask your Matterhorn system administrator for some information.
First of all, You need the admin host address, including the port. For example:
host = http://fakeadmin.matterhorn.com:80
You also need a digest user - a regular one won't work. There is a default digest account that should be replaced with your own values.
username=  matterhorn_system_account
password= CHANGE_ME
You also need to set up a default workflow and its parameters. Scheduled recordings will have his own workflow and parameters, defined in the scheduling operation, but the recordings started manually won't. The usual parameters you have to set up are captions and trimHold, which default to False. The normal configuration is:
workflow = full
workflow-parameters = trimHold:true
If you set up more than one parameter:
workflow-parameters = trimHold:true;captions=True
Finally, you have to decide if your recordings will be recorded automatically or not. If you want to do so, set default to True. All the configuration together will look like:
[ingest]
active = True
default = False
host = http://fakeadmin.matterhorn.com:80
username = matterhorn_system_account
password = CHANGE_ME
workflow = full
workflow-parameters = trimHold:true
This piece of code must be written on one of the configurations file. Be aware that values in conf.ini will overrule its equivalent in conf-dist.ini.
Sections to order
Webcam configuration
Logitech c920 is an HD webcam with optic lens and automatic behaviour - white balance, autofocus, auto-aperture.
It records 24 fps at 720p. The default configuration is:
- power-line-frequency:50Hz
- cappabilities: image/jpeg,framerate=24/1,width=1280,height=720
Back to 4:3
If you want you can cut part of the video to record a non-panoramic video including in the configuration: - videocrop-left=160
- videocrop-right=160
The value is in pixels
To set manual values on the parameters of the webcam use a tool called guvcview:
- Open a terminal and run:
{code:none
guvcview -oUnknown macro: {none}