|
Galicaster Dashboard is a web-based solution to monitor and manage a great number of Capture Agents. Galicaster Dashboard takes advantage of the Opencast Matterhorn capture agent API, so any agent implementing it can be accessed by the Dashboard, including Galicaster and the standard capture agent. Its main features are:
Click over to expand the image
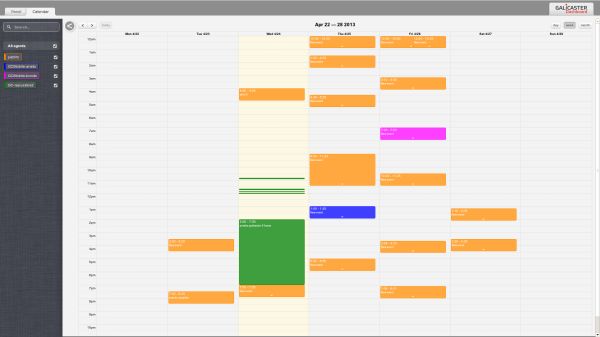
Screencast availablePlease check our screencast so you can see how it looks. First demo version - coming soonThe first demo version is almost ready. Source code and installation instructions will be also available. Galicaster Dashboard has been created in the form of am Opencast Matterhorn bundle, so it can be easily installed on your Matterhorn deployment. View modesGalicaster Dashboard provides two views: a panel view to monitor your agents providing auto-refreshed screenshots and basic data, and a calendar view, where the recording schedule can be easily checked and modified. In both cases, the agents on the screen can be filtered according to different criteria, so that only the relevant information is displayed. Panel ViewThe panel view is aimed to monitor the agents in your installation. Agents can be filtered by their status or their upcoming events, and also hidden at will. Screenshots are refreshed automatically. The panel view has two layouts:
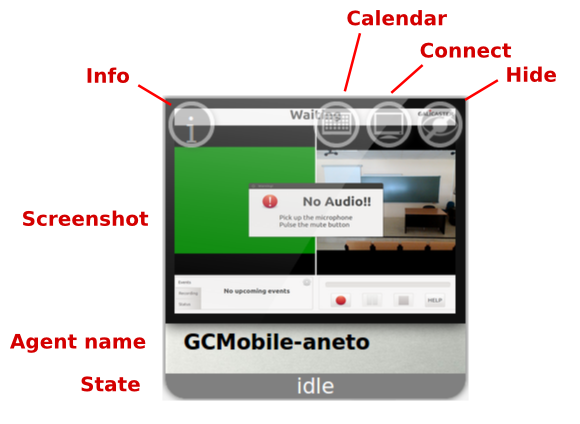
Mosaic layoutFrom the mosaic view we can see the agent status with a preview (screenshot) of their UI. The following actions are available by pressing on the different buttons on the screen:
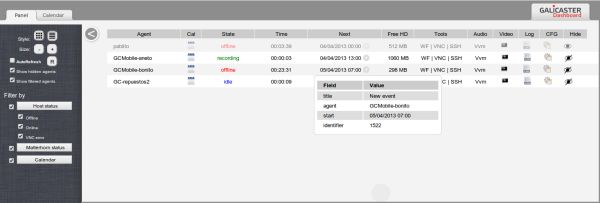
Table layoutThe table layout provides a more detailed collection of information including: duration of the last recording, next recording, free disk space, audio and video feedback, etc. There are also shortcuts to a detailed view of the agent's screen and tools to review the agent configuration, logs and access via ssh (coming soon!). Agent ViewThe agent view displays a screenshot of the agent's interface (updated automatically), and a table with useful information including the current loaded profile. There are also shortcuts to other tools available also in the table layout. Calendar ViewThe calendar provides an interface to browse, review, schedule or modify the recordings in your capture agents. The recordings are rescheduled by simply dragging and dropping them on the appropriate stop in the calendar, and their duration can be also edited by dragging-and-dropping their bottom side. Clicking on a given schedule will open a form where the recording metadata can be edited. This form also provides a finer control of the schedule parameters. Installation instructionsExternal dependenciesMost of the functionalities in the Dashboard will work out-of-the-box, but the screenshot extraction has an external dependency with GStreamer. Additionally, the command-line utility gst-launch and the "good" and "bad" plugins must be installed. Versions above 0.10.29 are proven to work. Older releases may or may not work.
Bundle installationThe Dashboard is packaged as a Matterhorn bundle, so it can be easily deployed in any Matterhorn installation. Since it depends on certain Matterhorn services to work, it must be installed in the admin server. In the following steps, ${MH_SRC} denotes the directory where the Matterhorn source code is, and ${FELIX_HOME} the directory where the Felix instance is installed (for Matterhorn versions under or equal to 1.3).
ConfigurationThe Dashboard service configuration file should be located in org.galicaster.dashboard.DashboardService.properties. It will not exist the first time you use the Dashboard, but the service will work correctly even if the file does not exist. Therefore, you may create the file only if you need to specify some of the configuration properties allowed by the service.
The following example illustrates how the properties defined above are used: When the Dashboard needs to establish a VNC connection with the agent GC-example, the password used will be, in that order:
|
ScreencastScreenshotsPanel view - Mosaic layoutPanel view - Table layoutCalendar viewAgent viewScheduler |
Loading sub-menu...
Galicaster Dashboard |
Skip to end of metadata
Go to start of metadata
 You are viewing an old version of this page. View the current version.
Compare with Current |
View Page History


